简单的HTML网页图片轮播切换[代码注释详解]
- 效果展示
- 1.必须的html元素
- 2.css代码
- 3.JavaScript代码
- 4.思路总结
- 觉得有帮助点个赞吧
效果展示
具体解释请参考代码中的注释!
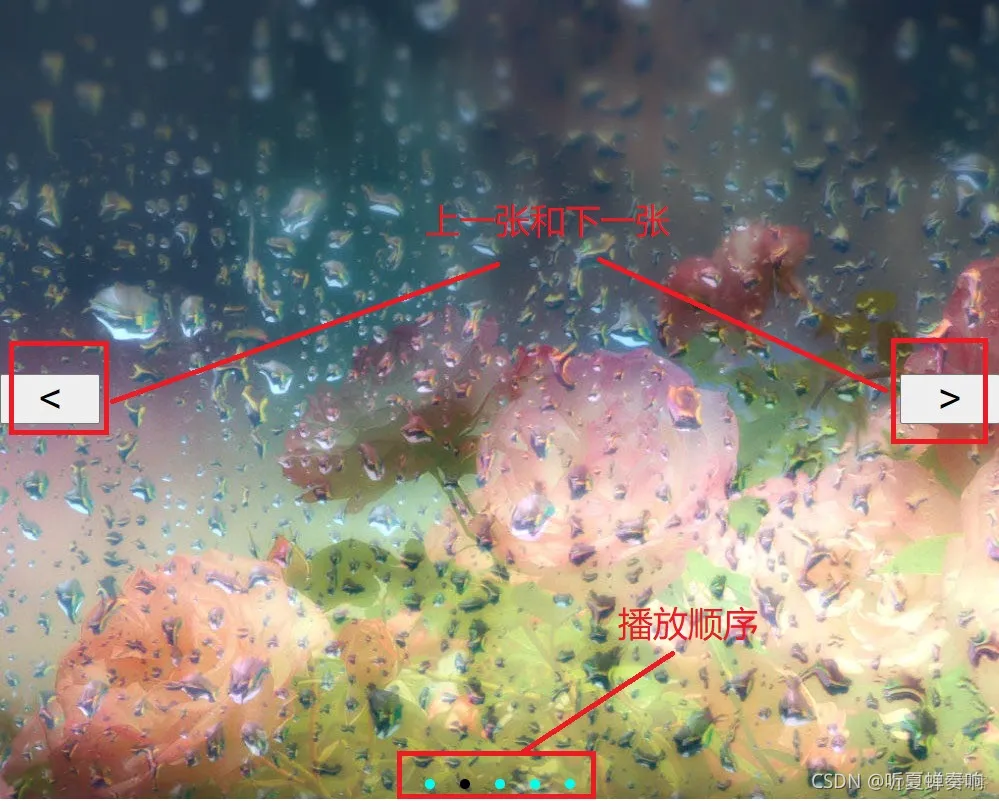
总共展示5张图片,图片中间下方5个点的代表展示顺序。(如图可知播放到第二张图片)
图片左右两边的箭头上一张和下一张!

1.必须的html元素
2.css代码
<style>
	*{
		/*去除margin和padding避免定位出现干扰*/
		/*星号代表选择所有元素*/
		margin:0px;
		padding: 0px;
	}
	#d1{
		position:absolute;
		width:1000px;/*定义宽高*/
		height:800px;
		background-repeat: no-repeat;/*图片不会平铺出现*/
		background:url(1.jpg);/*图片用背景的方式展示在d1块上*/
	}
	.i2{
		/*定义按钮大小位置*/
		width: 100px;
		height: 50px;
		position:absolute;/*绝对定位*/
		top: 50%;
		right: 0px;
		margin-top: -25px;
		font-size: 40px;/*字体大小,采用<>俩符号*/
	}
	.i1{
		/*定义按钮大小位置*/
		width: 100px;
		height: 50px;
		position:absolute;/*绝对定位*/
		top: 50%;
		left: 0px;
		margin-top: -25px;
		font-size: 40px;
	}
	#d2{
		/*定义播放顺序板块的大小位置*/
		position:absolute;/*绝对定位*/
		width:200px;
		height: 30px;
		background: none;/*无背景,理解为透明*/
		bottom: 0px;
		left:50%;
		margin-left: -100px;
		display: flex;/*横向排列,使5个点横向排列*/
	}
	#d21,#d22,#d23,#d24,#d25{
		/*定义播放顺序板块中每一个小圆圈的大小和位置*/
		width:10px;
		height: 10px;
		background: rgba(0,255,243,1.00);/*rgba四个字母代表红绿蓝透明*/
		/*这里其实使用rgb或者16进制就可以,多此一举了*/
		position: relative;/*相对定位,相对于自身未设置之前的位置*/
		margin-top: 10px;
		margin-left: 25px;
		border-radius:5px;
	}
</style>
3.JavaScript代码
<script>
	var i=1;
	var m=800;
	window.onload=function start(){
		ti();
	}
	//window.onload代表页面加载即执行
	function ti(){
		tim=setInterval("pho()",1000);//定义一个1000毫秒执行一次的计时器,执行pho()函数
		color(i);//引用color()函数,自己写的,在下面
	}
	function pho(){
		if(i==5){
			i=0;
			}
		i=i+1;
		var a=document.getElementById("d1");
		magicti();//引入幻灯片效果
		color(i);
		if(i==5){
			i=0;
			}
		//if分支表示1000毫秒执行一次,当i等于5就是第五个图片时候i=0,下一张执行就是i+1,即第一张
	}
	function off(){
		//鼠标悬浮停止播放
		//停止俩计时器
		clearInterval(tim);
		clearInterval(mati);
		}
	function on(){
		//鼠标离开重启计时器,开始播放
		ti();
	}
	function add(){
		var a=document.getElementById("d1");
		i=i+1;
		magicti();//引入幻灯片效果
		clearInterval(mti);
		color(i);//停止计时器,防止计时器叠加
		if(i==5){
			i=0;
			}
	}
	function noadd(){
		var a=document.getElementById("d1");
		i=i-1;
		if(i==0){
			i=5;
			}
		magicti();//引入幻灯片效果
		clearInterval(mti);//停止计时器,防止计时器叠加
		color(i);
	}
	function color(i){
		//color()的作用在于根据展示不同的图片改变顺序点的颜色
		var d21=document.getElementById("d21");
		var d22=document.getElementById("d22");
		var d23=document.getElementById("d23");
		var d24=document.getElementById("d24");
		var d25=document.getElementById("d25");
		//以上获取那五个点
		//下面是一个switch分支结构
		switch(i){
			case 1:
				//第一个图片,第一个点变黑,还原其他四个点的颜色,之后以此类推
				d21.style.background="black";
				d22.style.background="rgba(0,255,243,1.00)";
				d23.style.background="rgba(0,255,243,1.00)";
				d24.style.background="rgba(0,255,243,1.00)";
				d25.style.background="rgba(0,255,243,1.00)";
				break;
			case 2:
				d21.style.background="rgba(0,255,243,1.00)";
				d22.style.background="black";
				d23.style.background="rgba(0,255,243,1.00)";
				d24.style.background="rgba(0,255,243,1.00)";
				d25.style.background="rgba(0,255,243,1.00)";
				break;
			case 3:
				d21.style.background="rgba(0,255,243,1.00)";
				d22.style.background="rgba(0,255,243,1.00)";
				d23.style.background="black";
				d24.style.background="rgba(0,255,243,1.00)";
				d25.style.background="rgba(0,255,243,1.00)";
				break;
			case 4:
				d21.style.background="rgba(0,255,243,1.00)";
				d22.style.background="rgba(0,255,243,1.00)";
				d23.style.background="rgba(0,255,243,1.00)";
				d24.style.background="black";
				d25.style.background="rgba(0,255,243,1.00)";
				break;
			case 5:
				d21.style.background="rgba(0,255,243,1.00)";
				d22.style.background="rgba(0,255,243,1.00)";
				d23.style.background="rgba(0,255,243,1.00)";
				d24.style.background="rgba(0,255,243,1.00)";
				d25.style.background="black";
				break;
			   }
	}
	function magic(){
		//简单的幻灯片效果,使图片从下方滑动进入
		m=m-4;
		var d1=document.getElementById("d1");
		d1.style.backgroundPosition="0px "+m+"px";
		d1.style.backgroundRepeat="no-repeat";
		if(m==0){
			m=800;
			clearInterval(mti);
		}
	}
	function magicti(){
		//简单的幻灯片效果,使图片从下方滑动进入
		mti=setInterval("magic()",1);//每一毫秒图片向上滑动
		var d11=document.getElementById("d1");
		d1.style.background="url("+i+".jpg)";
		d1.style.backgroundRepeat="no-repeat";
	}
</script>
4.思路总结
1.设置一个div展示图片,设置div大小,展示范围
2.进入页面,图片开始播放,我的方法比较死板,一般可以考虑将图片存储到一个数组里,更加方便.只需要利用数组遍历即可实现图片的播放
3.幻灯片滑动效果不是必须的,可以单传更改为图片地址切换,改变背景的链接,不利用js添加动画效果更加简单
觉得有帮助点个赞吧
原创文章,作者:皮蓬,如若转载,请注明出处:https://blog.firsource.cn/news/259.html

